In the high-stakes world of EMS manufacturing—where giants like Scanfil and Celestica operate—Optical Inspection (AOI) is no longer enough. With the miniaturization of components (CSP, QFN, Flip-Chip) and the ubiquity of BGAs, the most critical solder joints are hidden from view.
Seamark ZM’s X-Ray Inspection Systems provide the Non-Destructive Testing (NDT) capability required to meet IPC-A-610 Class 3 standards. We don't just "see" through the board; we analyze the internal quality of every connection to prevent field failures.
Visual inspection cannot detect the most common defects in modern SMT processes:
Voiding (气泡): Trapped gas that weakens the joint.
Head-in-Pillow (HiP): A defect where the solder ball rests on the pad but doesn't coalesce.
Solder Bridging: Micro-shorts hidden under the component body.
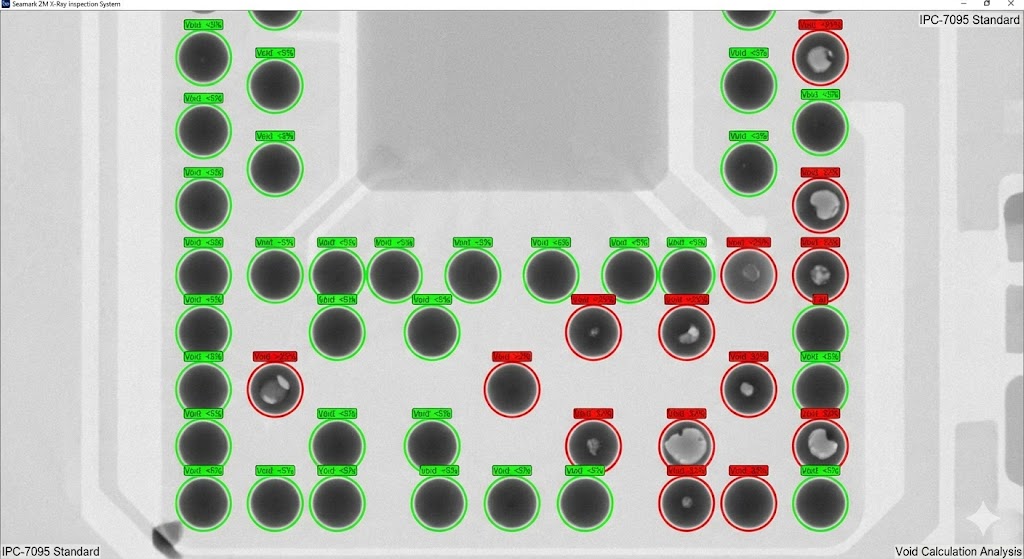
According to IPC-7095 standards, voiding in BGA solder balls must typically be kept under 25%. Seamark ZM equipment automates this measurement, removing human error from the equation.
As seen above, our software automatically identifies voids and calculates the percentage area, generating a Pass/Fail result instantly.
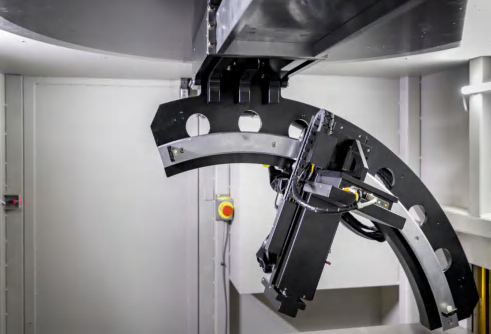
Precision starts with the hardware. Seamark ZM (e.g., ) utilizes industrial-grade components designed for 24/7 operation.
Micro-Focus Closed Tube: With a focal spot size as small as 2μm, our system can detect defects that are invisible to standard medical X-rays. High magnification ensures clarity even for 0.3mm pitch devices.
5-Axis Linkage & Tilt Detection (60°):A top-down view isn't always enough. Our detector can tilt up to 60 degrees. This allows operators to look "under" the BGA ball to detect Head-in-Pillow defects and layer separation, which are critical for reliability in automotive and server electronics.
For Tier-1 EMS providers like Scanfil, efficiency is key. Manual inspection is too slow for mass production.
Seamark ZM integrates CNC Programmable Inspection:
Map Creation: Engineers can set inspection points on the PCB navigation map.
Auto-Run: The machine automatically moves to each coordinate, optimizes voltage/current, captures the image, and analyzes it.
Batch Processing: Suitable for inspecting trays of chips or identical PCBA panels, dramatically increasing UPH (Units Per Hour).
X-Ray inspection is the judge; the Rework Station is the surgeon. To establish a complete quality loop, industry leaders integrate Seamark ZM’s inspection data with our rework capabilities.
Step 1: Detect the specific defect (e.g., Bridge on Pin A1) using the X-Ray System.
Step 2: Transfer the board to the for precision desoldering and replacement.
Step 3: Re-inspect via X-Ray to confirm the void rate is within IPC specs.
This closed-loop process is why top manufacturers trust Seamark ZM for their most expensive boards.
Don't leave your product quality to chance. Whether you are validating a new NPI process or conducting batch quality control, Seamark ZM provides the "eyes" you need to ensure zero defects.
Ready to upgrade your Quality Control?
Contact us for a sample test—send us your board, and we will send you the X-Ray report.
 EN
EN
 es
es  ko
ko  de
de  it
it  pt
pt  th
th  ar
ar  pl
pl  vi
vi  tr
tr  ru
ru

